I’ve found that when working on projects with a 3D printer, some designs can be too large to fit on the printer’s build plate. But don’t worry, there is a solution! You can still print the project by designing it in a 3D modeling program and then splitting it into multiple pieces to assemble afterward. This will result in a single, larger part that can exceed the print bed size.
How do you break up .stl or .step files for 3D printing?
I’ve found that nowadays, it’s really convenient to take any 3D model and split it up directly in the slicer. Plus, the program will even automatically insert pins for alignment. For this tutorial, we’ll be using PrusaSlicer to break up the models. You can download this program for free by clicking the link we’ve provided.
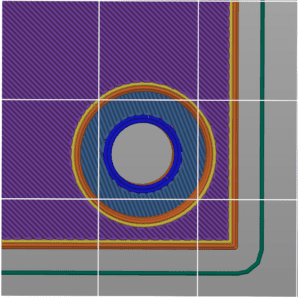
First, open PrusaSlicer and import your model by dragging it into the program. Keep in mind that the slicer only accepts .step or .stl files, so you may have to convert your 3D model to one of these file types before moving forward. In this instance, we’ll be utilizing a solid model of a 1-gallon container that holds my IPA. As displayed in the image on the right, the container is too big for my build plate, as evidenced by the dark blue areas outside the build plate and the error message.

To continue with the printing process, you’ll need to switch to the cutting tool located on the left-hand side of the screen. The cutting plane will be automatically placed in the center, but feel free to adjust its position and rotation as needed. Once the plane is set, click on the “Add Connectors” button to proceed.

This is what I like about this program. All you have to do is click where you want the connectors on the cut, and the program will automatically make the holes and pins for you. For an object this big, I like to use the frustum style of plugs but on smaller items, you’ll use the the normal prisms. Make sure to size up your plugs, set the tolerances and you’re all set to go. Press the Confirm connectors button. If everything looks right go ahead and Perform the cut.

Once you’ve reached this point, you’ll have two separate items that are ready to be printed. You can either export them and add them to your own slicer or print them directly with this one. In the next section, we’ll go over what you should do after these pieces have been printed.

Check out the video below for information on the features of this cutting tool. It demonstrates adding connectors with a single click and changing the cut orientation to your liking.
How to assemble 3D Printed Parts
Once all the pieces of our model have been printed, it’s time to put them together. There are several methods to achieve this, including using glue, magnets, or just stacking the objects on top of each other. In the case of the jug above, bonding the pieces together is unnecessary since one piece can rest on top of the other.
Assembling 3D prints with Magnets

I’ve found that using magnets to assemble pieces is a simple and efficient technique. If you want to give it a try, you can use the same cutting method as before, but instead of using a plug in the “Add Connectors” settings, use a dowel in its place. Just make sure the dowel is the size of the magnet you intend to use, and you can delete it before printing. This method is easy to follow and should yield great results.
Take a look at this fidget toy. Its design is really cool because you can attach magnets to the holes and move the button around to each magnet. It’s a great way to keep your hands busy and entertain yourself.
Assembling 3D prints with Glue
If you want to ensure that your larger prints stay securely together, I recommend using either JB Weld or Loctite’s Super Glue. These options have a higher debonding temperature than the plastic pieces you are joining, so you’ll need to melt the parts to separate them. This creates a strong bond, but be careful during the gluing process – if you make a mistake, you may need to reprint the parts.
When selecting from different glue options, it is essential to consider their preparation time and viscosity. JB Weld, for instance, requires preparation time as it involves mixing two solvents and applying the glue with an apparatus, such as a toothpick. Because of its thick consistency, it creates a more robust bond with fewer gaps and less leakage when pressing the pieces together. As it turns out, this glue can be a game-changer for many individuals who need to bond objects together.
When working with the Loctite adhesive, I have found that it is easy to prepare but can be quite liquid. To apply it, I usually use the bottle directly on the part. However, I have noticed that the consistency can sometimes cause leakage from the seams. Additionally, I have had issues with this adhesive when working with gaps in the seam, as it struggles to hold unless everything is touching.
Based on our experience with 3D printing, we have found that separating parts does not necessarily weaken them. In fact, we have run tests that show that in most cases, the parts actually broke in the area where they were 3D printed, rather than in the glued area. Applying super glue can actually increase the strength and durability of your parts. This is a useful tip to keep in mind if you want to reinforce specific axis of your parts.