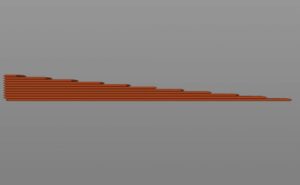
3D printing layer lines is a process where an object is made one layer at a time, building upon the previous layer. This process is great for making anything you could ever want, but there is one side effect. When printing small angles in relation to the bed, the printer creates a stair-step effect on your part. These features can really destroy the quality of your 3D prints, having nothing to do with the machine itself. In this guide, we’ll dive into the reasons behind your visible stair steps and how to 3d print layer lines.
What Causes Layer Lines?
When running a 3D model through a slicer, the program takes your part and splits it into layers in the z-axis. The number of times the part is split is based on the settings within the slicer: nozzle diameter and layer height. Since most printers are running a 0.4mm nozzle diameter, we’ll focus more on the layer height in this guide.
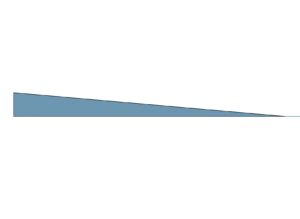
As the printer creates a part, one layer at a time, it’ll have trouble making curved surfaces or very gradual angles in the z-direction. The resolution plays a huge factor in these kinds of features.
It’s like the difference in playing Pokemon on a Gameboy color back in the ’90s vs a Switch today. The Gameboy Pokemon is all pixilated and hard to see. This is the same resolution problem the printer runs into with these features. Each feature is getting sliced up into the resolution of the layers.
Visible layer lines have two separate variables to keep in mind. The first is the resolution of the 3D print in your slicer settings, and the other is the angle between the surface of the part and the print bed. As the angle gets smaller, the more defined the layer heights will become. Conversely, the smaller the resolution, the smaller the angle you can print. We’ll dive into this more when we talk about how to fix these visible lines.
How do You Fix Layer Lines?
There are multiple ways to fix layer lines, from print orientation to changing the angles in the 3D model. We’ll even talk about some modifications that can be done to the printer to reduce those horizontal lines even more.
Angles of a 3D Model
The best way to reduce layer lines is to manipulate the two variables that create the layer lines in the first place. The relationship is between the angle of the part (in our case, the angle of the wedge) and the layer height the printer is using.
Both conditions are created in two different software. The angle of the part is set in the 3D modeling program, and the layer height is set in the slicing software.
The relationship is defined by the table below. The resolution refers to the layer height, and the degree is the smallest angle from the build plate to the surface of the part where you don’t see layer lines. Mainly, the smaller the resolution, the smaller the angle that you can capture in the z-axis.
The trade-off is the smaller the resolution, the longer your printing time will be. A general rule of thumb is going from 0.2mm resolution to 0.1mm resolution will double the print time it takes to make a 3D print. Half the resolution will double the number of layers. You should try to find the sweet spot between these variables. Keep away the layer lines, but don’t let the print time get out of control.
Orientation
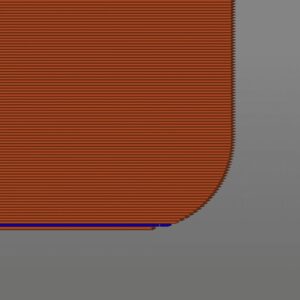
The easiest way to eliminate layer lines is to orientate the object so that the small angle is in the xy plane. As you can see in the pictures below, the stair step effect turns into a smooth surface just by rotating the object 90 degrees. This is because the object only gets split into layers in the z-axis. Any angles in the xy plane can just be overcome with some motor movements. Depending on what 3D printer you have, this can create some really unique and high-quality objects.
Nozzle Diameter
As a side note, nozzle diameter is not a feature that helps in removing layer lines. Layer lines are a problem that manifests in the z-direction, which can be fixed with the layer height. The nozzle diameter fixes problems in the xy plane.
Going down to a smaller nozzle diameter will fix small details on 3D prints, such as small text or figurines.
There are a few downsides to going to a smaller nozzle diameter. The first is the print speed at which you can create your 3D prints. Since the hole of the nozzle got smaller, there is only so much material that can come out at a time. Also, you’ll have to make more pass-throughs of the same perimeter as opposed to larger nozzles to get these same thickness.
You might also run into mechanical problems. Since the nozzle is so small, fine dust particles that drop into the nozzle will be too big to go out the other side. After a few 3D prints are created, you’ll find filament comes out of the nozzle at a slower pace or just not at all.
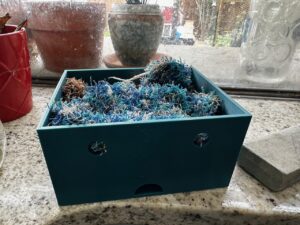
Example: 3D Print Layer Lines in a Scouring Pad Tray
I recently came across a problem with the bowl that held our scouring pads. After washing dishes, it would always have a pool of water at the bottom, and it didn’t seem like the pool ever went away. I figured that I could 3D print out a new bowl that would allow the excess water to drain out of the bottom.
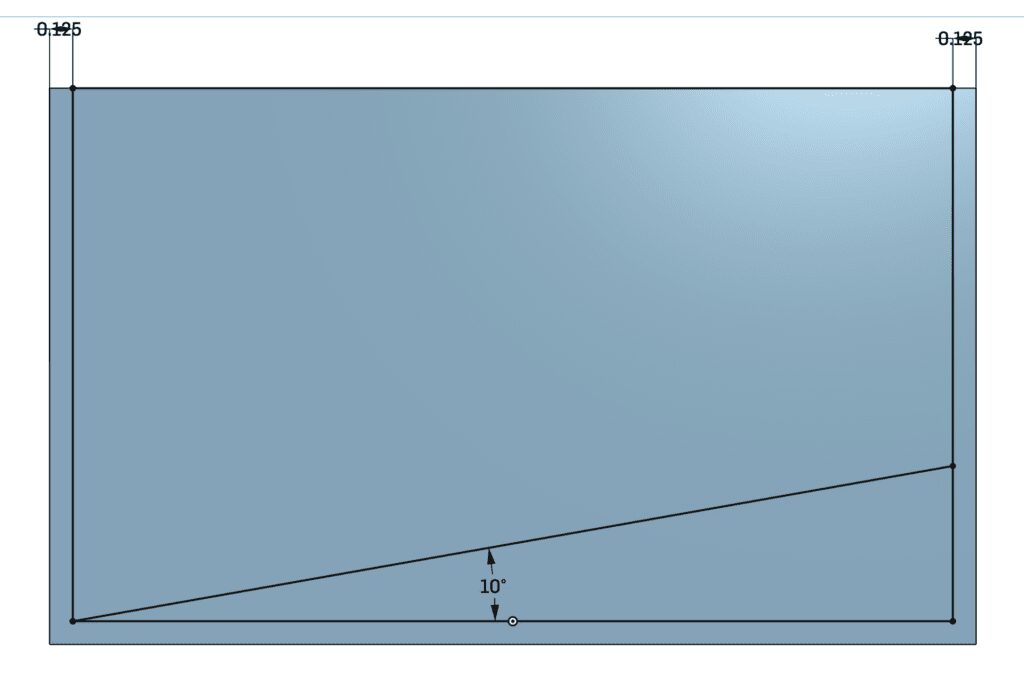
Here is where our new skill can come into effect. We’ll make a five-sided box with an incline at the bottom for the water to drain. At the bottom of the incline, we’ll create an arch-shaped hole so the water has somewhere to go. I even added two holes towards the top of the container so it looks like a face.
The main concern is with the incline of the bottom of the container. If we create a ramp that is too shallow, the printer will create a stair-step effect, and the water won’t drain properly. On the other hand, if the bottom is too steep, that cuts into our much-needed scouring pad space. Based on the table above, if we are using a standard layer height of 0.2 mm, then the ramp at the bottom just needs to be 10 degrees. This should be plenty of surface for the water to run down and plenty of space for pads.
I like this design in particular because it is easy to print without support material. You can put it next to your sink, and the water will go right where it is supposed to be—no more pooling inside the bowl, creating mold and smelly pads.
I conceive this site contains some real excellent information for everyone. “Good advice is always certain to be ignored, but that’s no reason not to give it.” by Agatha Christie.


I conceive this site contains some real excellent information for everyone. “Good advice is always certain to be ignored, but that’s no reason not to give it.” by Agatha Christie.
This article is packed with useful information and was
a great read. The website is also a fantastic resource for learning.
This content was extremely informative and provided exactly what
I needed. The site is very professional and always
worth visiting.